Make Creamy Homemade Ricotta: 3 Ingredients, Simple Steps
Imagine a cheese so fresh, so exquisitely creamy, it melts in your mouth and elevates every dish it touches. What if we told you that this culinary delight, often associated with artisanal Italian production, could be yours in less than an hour, using just three simple ingredients you likely already have? Welcome to the world of homemade ricotta cheese, a game-changer for any food lover. Forget store-bought tubs; once you taste the rich, mild sweetness of your own freshly made ricotta, you might never look back.
This isn't just a recipe; it's an experience. It’s about rediscovering the joy of simple, wholesome ingredients transforming into something truly special. From the gentle warmth of the milk to the magical moment curds begin to separate, making ricotta at home is surprisingly easy and incredibly rewarding.
Understanding Ricotta: A Quick Clarification
Before we dive into the making, let's briefly clarify what ricotta cheese truly is, and what this particular recipe offers. The name "ricotta" literally means "recooked" in Italian, traditionally referring to a cheese made by reheating the leftover whey from other cheesemaking processes (like mozzarella or provolone). This traditional method extracts even more protein from the whey, resulting in a light, slightly granular, yet creamy cheese.
The homemade ricotta we’re about to create, however, takes a delightful shortcut. It’s made directly from whole milk, using an acid to curdle it. While technically not a "true" ricotta in the traditional sense, this milk-based version yields an ultra-creamy, light, and wonderfully flavorful cheese that is incredibly versatile and often preferred for its smooth texture. It’s a "fresh cheese" that perfectly emulates the taste and versatility of its traditional counterpart. For a deeper dive into the nuances of various ricottas and their distinctions, explore our article on
Ricotta Cheese Explained: Homemade vs. Traditional & Cottage.
Making Your Own Creamy Ricotta: The 3-Ingredient Method
The beauty of this recipe lies in its simplicity. With minimal fuss and readily available ingredients, you’re just a few steps away from a fresh batch of incredible homemade ricotta.
Ingredients You'll Need
- 4 cups (approx. 1 liter) Whole Milk: This is the foundation of your creamy ricotta. Whole milk is essential for richness and proper curd formation. Avoid ultra-pasteurized (UHT) milk, as it won't curdle correctly.
- 2-3 tablespoons Lemon Juice or White Vinegar: Your chosen acid acts as the catalyst, separating the milk into curds and whey. Freshly squeezed lemon juice imparts a subtle brightness, while white vinegar offers a clean, neutral tang. A combination can also work beautifully.
- ½ teaspoon Salt (or to taste): Enhances the flavor of your ricotta. You can adjust this amount based on your preference and intended use.
Essential Tools:
You'll also need a large non-reactive pot, a heat-resistant spatula or spoon, a fine-mesh colander, and several layers of cheesecloth or a clean thin kitchen towel. A thermometer, while not strictly necessary, can be helpful for optimal results.
Step-by-Step Guide to Ricotta Perfection
- Prepare Your Draining Station: Line a fine-mesh colander with 2-3 layers of cheesecloth, ensuring there's enough overhang to gather later. Place the colander over a large bowl to catch the whey.
- Gently Heat the Milk: Pour the whole milk into your large pot. Add the salt and stir to combine. Heat the milk over medium heat, stirring occasionally to prevent scorching. The goal is to bring the milk to a gentle simmer, just below boiling, around 200°F (93°C). Look for small bubbles forming around the edges of the pot. Do not let it come to a rolling boil.
- Add the Acid and Witness the Magic: Once the milk reaches the desired temperature, remove the pot from the heat. Pour in 2 tablespoons of your chosen acid (lemon juice or vinegar). Stir *gently* just a few times. You should immediately see the milk begin to curdle, separating into distinct white curds and yellowish, translucent whey. If after a minute or two the separation isn't clear, add the remaining tablespoon of acid, stir once more, and wait.
- Let it Rest: Allow the pot to sit undisturbed for 10-15 minutes. This crucial resting period gives the curds ample time to fully form and separate from the whey, resulting in a cleaner separation and a better yield.
- Strain the Ricotta: Carefully pour the contents of the pot into your prepared cheesecloth-lined colander. The whey will drain into the bowl below, leaving the soft curds behind in the cheesecloth.
- Adjust for Desired Consistency: The draining time determines the final texture of your ricotta. For a softer, creamier ricotta, drain for about 15-20 minutes. For a firmer, more crumbly consistency (ideal for baking or pasta fillings), gather the edges of the cheesecloth, twist gently, and let it drain for 30-60 minutes, or even longer in the refrigerator. Avoid squeezing too hard, as this can make your ricotta dry and less creamy.
- Enjoy Your Fresh Ricotta! Once drained to your liking, transfer the ricotta to an airtight container. It's best enjoyed fresh but will keep well in the refrigerator for up to 5-7 days.
Tips for Ricotta Mastery: Elevating Your Homemade Batch
While the process is straightforward, a few key insights can elevate your homemade ricotta from good to absolutely divine.
Choosing the Right Milk is Crucial
The type of milk you use is perhaps the most significant factor in the success and flavor of your ricotta.
- No Ultra-Pasteurized (UHT) Milk: This is non-negotiable. Ultra-pasteurized milk has been heated to very high temperatures, which denatures its proteins in a way that prevents them from curdling effectively. Your ricotta simply won't form. Always opt for regular pasteurized whole milk.
- Whole Milk for Richness: While you *can* use lower-fat milk, whole milk provides the best flavor and creamy texture due to its higher fat content. The richness truly shines through in the final product.
- Consider Local or Organic: If possible, using fresh, high-quality local or organic milk can further enhance the flavor profile of your ricotta, giving it a depth that conventional milk might lack.
The Acid Test: Lemon vs. Vinegar
Both lemon juice and white vinegar are excellent choices for curdling milk, but they offer subtle differences:
- Lemon Juice: Imparts a slight, pleasant citrusy note that complements many dishes, especially sweet ones. Ensure you use regular fresh lemons, not sweeter varieties like Meyer lemons, which can affect the curdling process and flavor.
- White Vinegar: A more neutral option that allows the pure, milky flavor of the ricotta to dominate. It's often preferred for savory applications where you don't want a hint of citrus.
- Experiment with a Combination: Many experienced ricotta makers like to use a 50/50 blend of lemon juice and white vinegar for a balanced result.
Achieving Your Desired Texture
The consistency of your ricotta is entirely within your control through the draining time:
- Softer, Creamier Ricotta: Drain for a shorter period, around 15-20 minutes. This is ideal for spreading on toast, mixing into creamy sauces, or enjoying simply with a drizzle of olive oil.
- Firmer, Crumbly Ricotta: Drain for 30-60 minutes or longer. For very firm ricotta, you can even place a light weight on top of the curds in the colander (e.g., a small plate with a can on top) to gently press out more whey. This texture is perfect for baking (like cheesecakes), stuffing pasta shells, or making dryer fillings.
Enriching Your Ricotta: The Cream Factor
For an even more luxurious, decadent ricotta, consider replacing some of the whole milk with heavy cream. A popular ratio is 3 cups of whole milk to 1 cup of heavy cream. The added fat from the cream results in an exceptionally rich, velvety smooth ricotta that feels like a true indulgence. Add the cream to the milk at the beginning of the heating process.
Gentle Handling for a Smooth Texture
Once the curds have formed, handle them gently. Avoid excessive stirring or pressing before and during the straining process, as this can break down the curds too much, leading to a grainy or less desirable texture.
Beyond the Bowl: Endless Culinary Possibilities
The true magic of homemade ricotta lies in its incredible versatility. Its mild, slightly sweet, and creamy profile makes it a star in both sweet and savory applications. Fresh ricotta, especially when homemade, offers a nuanced flavor that store-bought versions simply can't match.
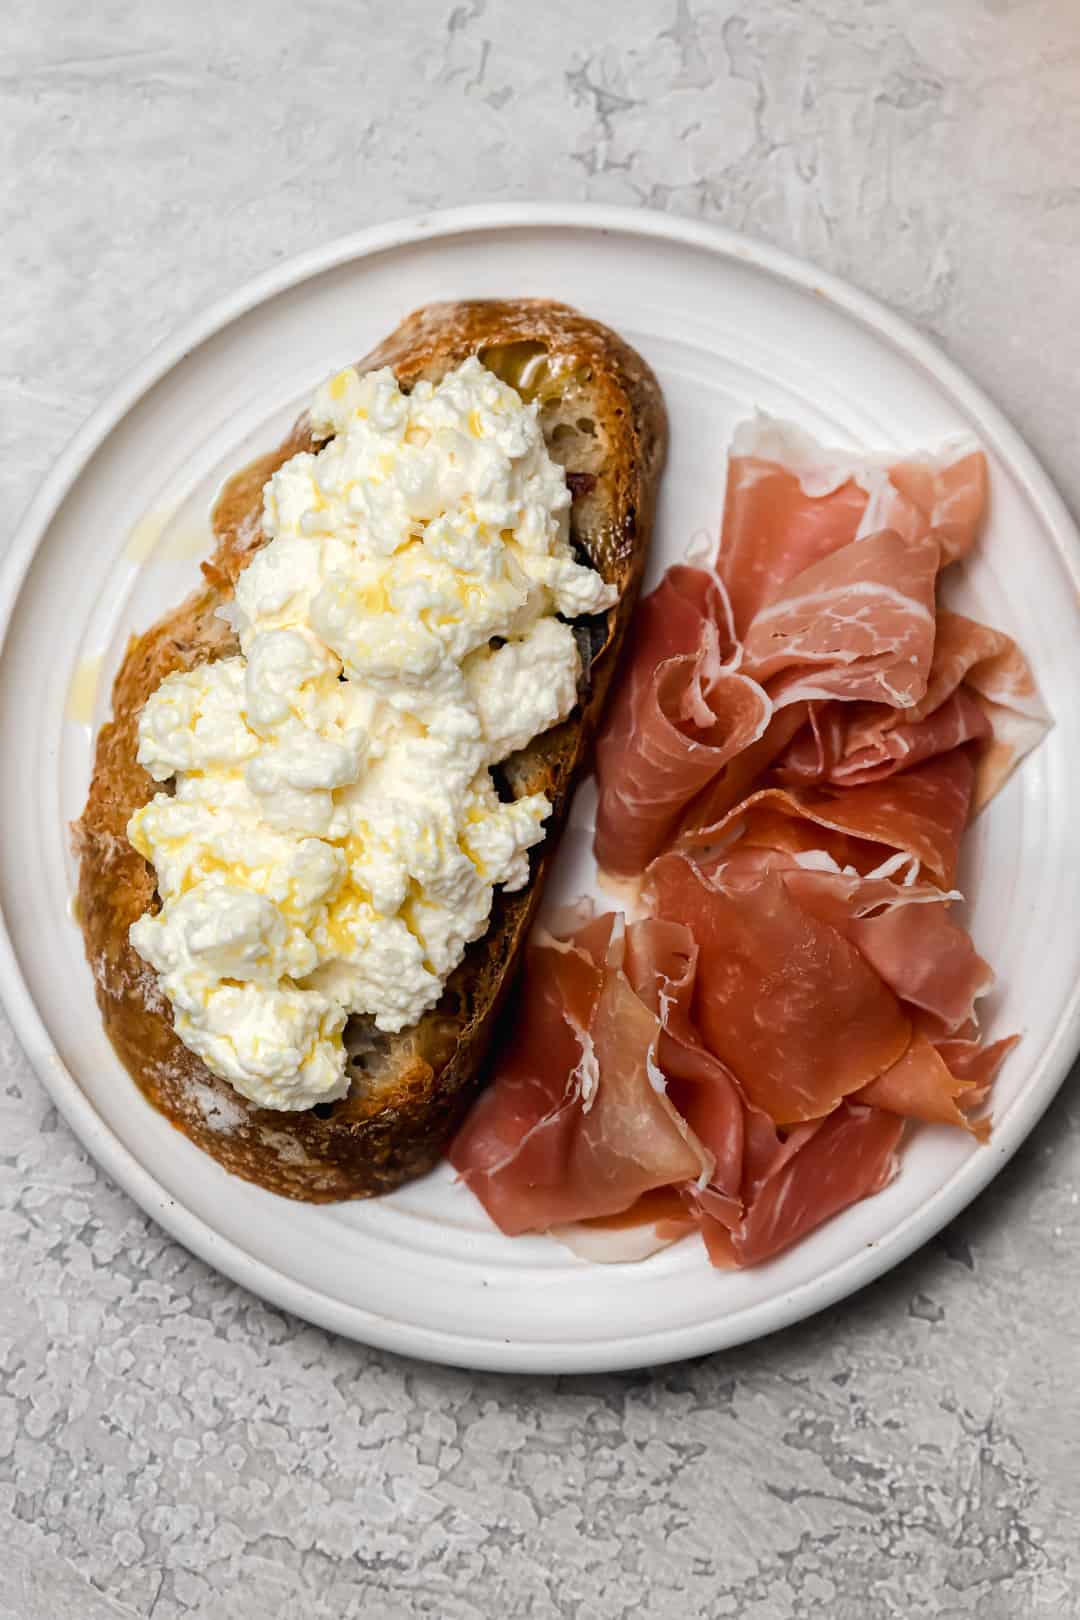
For a simple Italian delight, follow the lead of generations past: serve fresh ricotta on warm homemade bread with a drizzle of extra virgin olive oil, a sprinkle of black pepper, or a pinch of red pepper flakes. Or, toss it with hot spaghetti for a quick and satisfying meal.
But the possibilities extend far beyond:
- Savory Delights: Use it as a luscious filling for classic Italian dishes like lasagna, ravioli, stuffed pasta shells, or cannelloni. It's fantastic in frittatas, quiches, or as a creamy base for pizza. Baked ricotta with herbs, served with crusty bread, makes an elegant appetizer.
- Sweet Indulgences: Ricotta is a dream in desserts. Think creamy cheesecakes, authentic cannoli filling, lemon ricotta cookies, or simply as a topping for fresh fruit, perhaps drizzled with honey or maple syrup.
- Spreads and Dips: Blend it with herbs and spices for a healthy vegetable dip, or spread it on bruschetta or crostini for a quick and elegant snack.
To truly unlock the full potential of your fresh cheese, dive into our dedicated guide:
Homemade Ricotta: Sweet & Savory Uses for Your Fresh Cheese.
Ricotta vs. Cottage Cheese: What's the Difference?
Given their soft textures and sometimes similar uses, ricotta and cottage cheese are often confused. However, they are distinct products with different characteristics:
- Origin and Production: As discussed, traditional ricotta is made from whey, while our homemade version uses whole milk, coagulated with acid. Cottage cheese, on the other hand, is exclusively made from cow's milk curds (not whey), which are deliberately kept larger and often rinsed, resulting in a tangier flavor.
- Texture: Ricotta boasts a smoother, finer, and more uniform texture, even when slightly lumpy. Cottage cheese is characterized by its distinct, often visible curds, which can be small or large.
- Flavor Profile: Ricotta has a milder, slightly sweeter, and richer milk flavor. Cottage cheese tends to be tangier and sometimes saltier, with a more pronounced dairy flavor.
- Versatility: While both are versatile, ricotta's creaminess and mild sweetness make it particularly well-suited for a wider range of sweet and savory applications where a smooth, melt-in-your-mouth texture is desired. Cottage cheese is often favored for its distinct curds in salads, alongside fruit, or as a protein-rich snack.
While they can sometimes be swapped in recipes, the end result will definitely reflect their individual characteristics.
The Freshness You Deserve
Making homemade ricotta is more than just a culinary task; it's an exploration of simple ingredients yielding extraordinary results. The ease, the freshness, and the pure, creamy flavor of your own homemade ricotta will undoubtedly make you a convert. It's a testament to how traditional methods, even in a modern kitchen, can bring unparalleled taste and satisfaction. So gather your ingredients, set aside a little time, and prepare to embark on a delicious journey into the world of fresh, creamy ricotta cheese. Buon Appetito!